19 pH
Last edited: 09NOV2023 NP
Written for use with an Accumet pH meter, but the preparation process should be the same for other meters.
Here is a link to a blank data sheet for pH/EC.
19.1 Materials
- pH meter: Accumet basic, AB 15 pH meter, Fisher Scientific
- Calibration buffers (pH 4, 7, & 10) – shake these gently before using
- 50 ml Falcon centrifuge tubes, with lids
- Small graduated cylinder (10ml)
- DDI water
- DDI water rinse bottle
- Large beaker to catch dirty rinse water from rinsing electrode between samples
- Kim wipes
- Stopwatch or timer
- Vortex Genie Mixer – to shake falcon tubes on top of
- Double deionized water (DDI)
- 0.02M CaCl2
19.2 Procedure
- Preparing 0.02M CaCl2: 110.978 g/M x 0.02M/1 L = 2.22 g/L or 2.22 g CaCl2 / 1L H2O
19.2.0.1 Sample Preparation (in 50mL Falcon tube)
- Place ~10 g of the soil sample into the Falcon tube. Or fill to the 10 mL line.
- Add 10 mL of DDI water. For consistency, use the small plastic 10mL graduated cylinder. This pH method is a 1:1 (DDI:soil) ratio. For organic soils, do 2:1, with 20 mL DDI water. Document which samples have a 2:1 vs 1:1 ratio.
- Cover with lid and shake/mix it vigorously and thoroughly for 30-60 seconds. You can also use the Vortex mixer.
- Prepare 8-10 samples, spaced out each 4 minutes.
- Allow the samples to stand for one hour, but shake each sample for 30-60 seconds once every 20 minutes.
(shake at 0 minutes, 20 minutes, 40 minutes, 60 minutes then measure pH)
You could make a chart to keep track of which samples are to be shaken when. Ideally, each sample marinates for approximately 60 minutes. Try to stay away from the situation where the first 3 samples rest for 60 minutes, the next three for 70 minutes, the next three 80 minutes, etc. To avoid this, I found doing a run of 6-8, with each spaced 4 minutes apart worked well. You can start the next group of 6-8 samples within the same hour, as long as you can keep track of which need to be mixed when. A chart I drafted before beginning worked well for me, and I checked off which I had shaken at each interval as I went along.
- During the 1-hour marinating period, make sure the pH meter is turned on and standardized. The meter does not have to be standardized each time, but should be checked for proper calibration before and after each set of samples.
19.2.0.2 Calibrating the Electrode
- Have buffers available with pH 4.01, 7.00, and 10.01. Gently shake each buffer sample so it is mixed.
- With the pH meter on, press the calibrate button and insert the electrode into the pH 4.01 buffer solution. The meter might recognize the pH of the solution and would change the reading to 4.01. If it does this, press the calibrate button again to move on to the second calibration. The screen will read CAL.2 at the bottom.
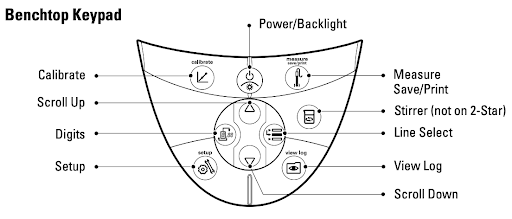
- If the meter does not recognize the solution as pH 4.01, you will have to change it manually. Press the digits button (see the diagram below) to edit the reading and the up/down arrows to change the numbers. Make sure the decimal is in the right spot!
- Once the meter screen reads CAL.2, rinse off the electrode with DDI water, dry, and insert into the pH 7.00 buffer solution. Repeat the process as outlined above. When the screen reads 7.00, press the calibrate button to move to the third calibration (CAL.3).
- If you only need a two-step calibration (pH 4 and 7), press the measure button to complete the calibration.
- Once the screen reads CAL.3, follow the same process with the pH 10.01 buffer solution. When done, press the measure button to complete the calibration. The screen will show the slope of the calibration curve before continuing to read the pH.
- Note: we are not currently calibrating with pH 10.01 buffer, just 4 and 7.
19.2.0.3 Measuring pH
- Shake the sample for the last time at time 60 minutes before inserting the pH electrode.
- Rinse the electrode with DDI and wipe it gently with a Kim wipe.
- Insert the electrode at the same depth for each sample. You can place a piece of tape on the upper part of the electrode that you can use such that it lines up with the tope of each tube (for example).
- Take the pH reading exactly 60 seconds after the last mixing, or when the pH stabilizes.
- Remove the electrode and rinse it, with DDI, rinsing into a beaker to collect dirty rinse water.
- Add 10 mL of 0.02M CaCl2 to the soil slurry.
- Shake vigorously for 30-60 seconds
- Insert pH electrode and take the second pH reading at exactly 60 seconds (or when the pH stabilizes).
- Rinse the electrode with DDI water into the designated beaker.
- Gently wipe/dry the electrode stem and dab its end with a Kim wipe before beginning the next sample.
- Repeat the process for the samples you prepared.
- When you are finished with the set of samples, test the buffers to verify that the pH meter is still calibrated properly. This should be done often. It only takes a moment.
- If you are finished for the day, press the “stdby” button on the meter to put it in standby (sleep) mode. It will still be standardized the next time you return. As the screen will tell you, hit stdby to resume. You should check the calibration by measuring the buffer solutions – plus or minus 0.1 from pH 4/7/10 is okay. More than that and you should recalibrate.
Electrode storage – IT IS ESSENTIAL to place the electrode in DDI water, either immersed in a small beaker of DDI water or place the electrode into the storage bottle which is filled with clean DDI water.
19.3 References and Notes
- To ensure that the solution inside the electrode does not evaporate, make sure the top is closed, as shown in the photo. The blue band twists to close.
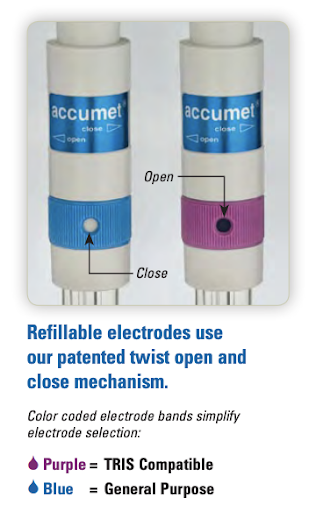
- After calibration, if the triangle with an exclamation mark is flashing, the electrode was calibrated incorrectly or the slope is outside the range of 85-115%. Try recalibrating the electrode. If that doesn’t fix it, refill the electrode solution (inside the electrode). There is a bottle refill solution in the pH meter box and a larger one in the chemicals cabinet- it’s 4M KCl saturated with AgCl. Put the pointed white cap on the solution. Twist the blue band on the electrode to expose the hole and squeeze the solution into it. It will seem like the solution is just dripping out, but it’s filling slowly.
Here’s a link to the pH meter manual. The troubleshooting section starts on page 55.